

- Transaction Signing: The Server-Signer connects to Coinbase Prime key management backend to facilitate automatic transaction signing. It adheres to the Prime Onchain Policy Engine rules and only signs transactions that you allow it to sign using the Coinbase Prime UI.
- Intent Attestation: Our backend systems cryptographically verify and attest that your original transaction intent remains unchanged throughout processing. Even if one of our internal systems were compromised, we would still detect any modifications to your original intent.
- Security: Key materials are backed-up by AWS with the Aurora DB backup policies. No single party ever holds a full private key. This approach leverages advanced cryptographic techniques to split key material between your infrastructure and our secure environment, ensuring that no single party has access to the complete private key. This provides extra security even if one’s systems are compromised.
Setup Guide
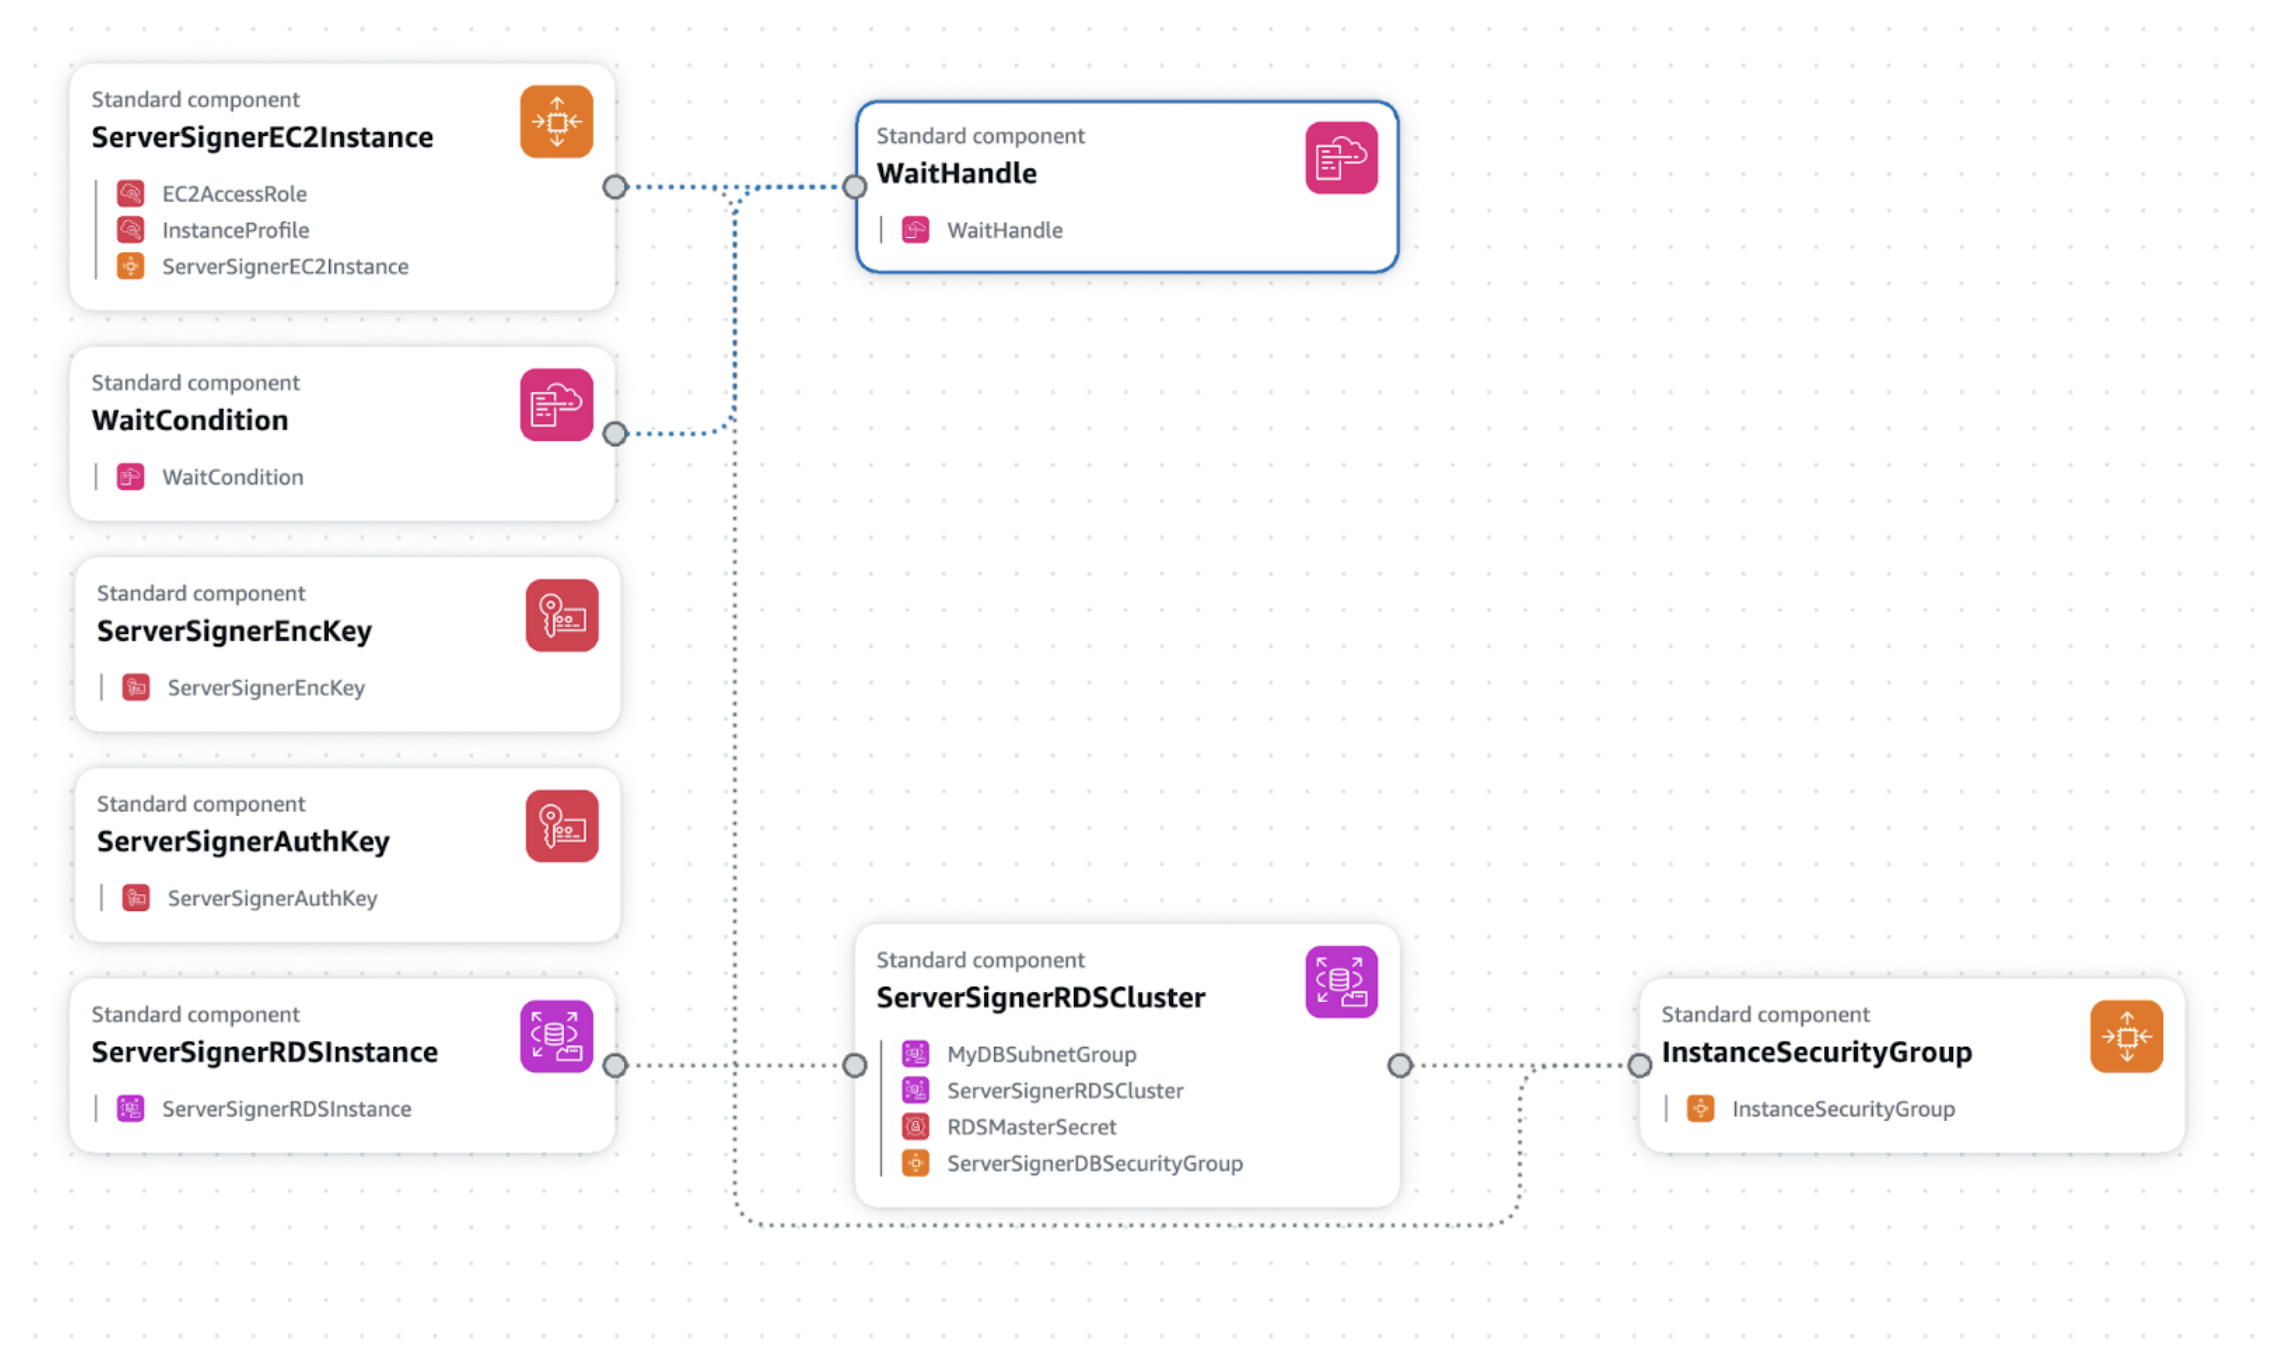
Pre-requisite: User has already completed onboarding in the portfolio to be used for Prime Onchain Wallet (keys are generated and available on a mobile device) and has an active AWS Account that can be used to host a Server Signer EC2 instance. AWS CloudFormation will be used to setup all the necessary resources using a provided template. The template will configure the following resources:- EC2 Instance: Hosts the Server-Signer application and runs the initialization script.
- Aurora PostgreSQL DB Cluster: Provides a managed database environment for storing encrypted key material and metadata.
- AWS KMS Encryption Key: Used for encryption operations within the application.
- AWS KMS Signing Key: Used for secure signing operations.
- Wait Condition Resources: Allow the stack to pause until the EC2 instance completes its setup.
Step 1: Create an SSH Key Pair for Debugging
The SSH key pair allows you to access the Server‐Signer EC2 instance for log inspection and troubleshooting.- Log in to the AWS Console and navigate to the EC2 dashboard.
- Under Network & Security, click Key Pairs.
- Click Create key pair, then:
- Enter a name (e.g., my-debug-key).
- Select PEM (for Linux/Unix) or PPK (for Windows/Putty).
- Download the private key and store it securely.
- Verify that the key appears in the Key Pairs list. You will select this key for the SSHKeyName parameter when creating your stack.

Step 2: Create Server Signer Stack using CloudFormation
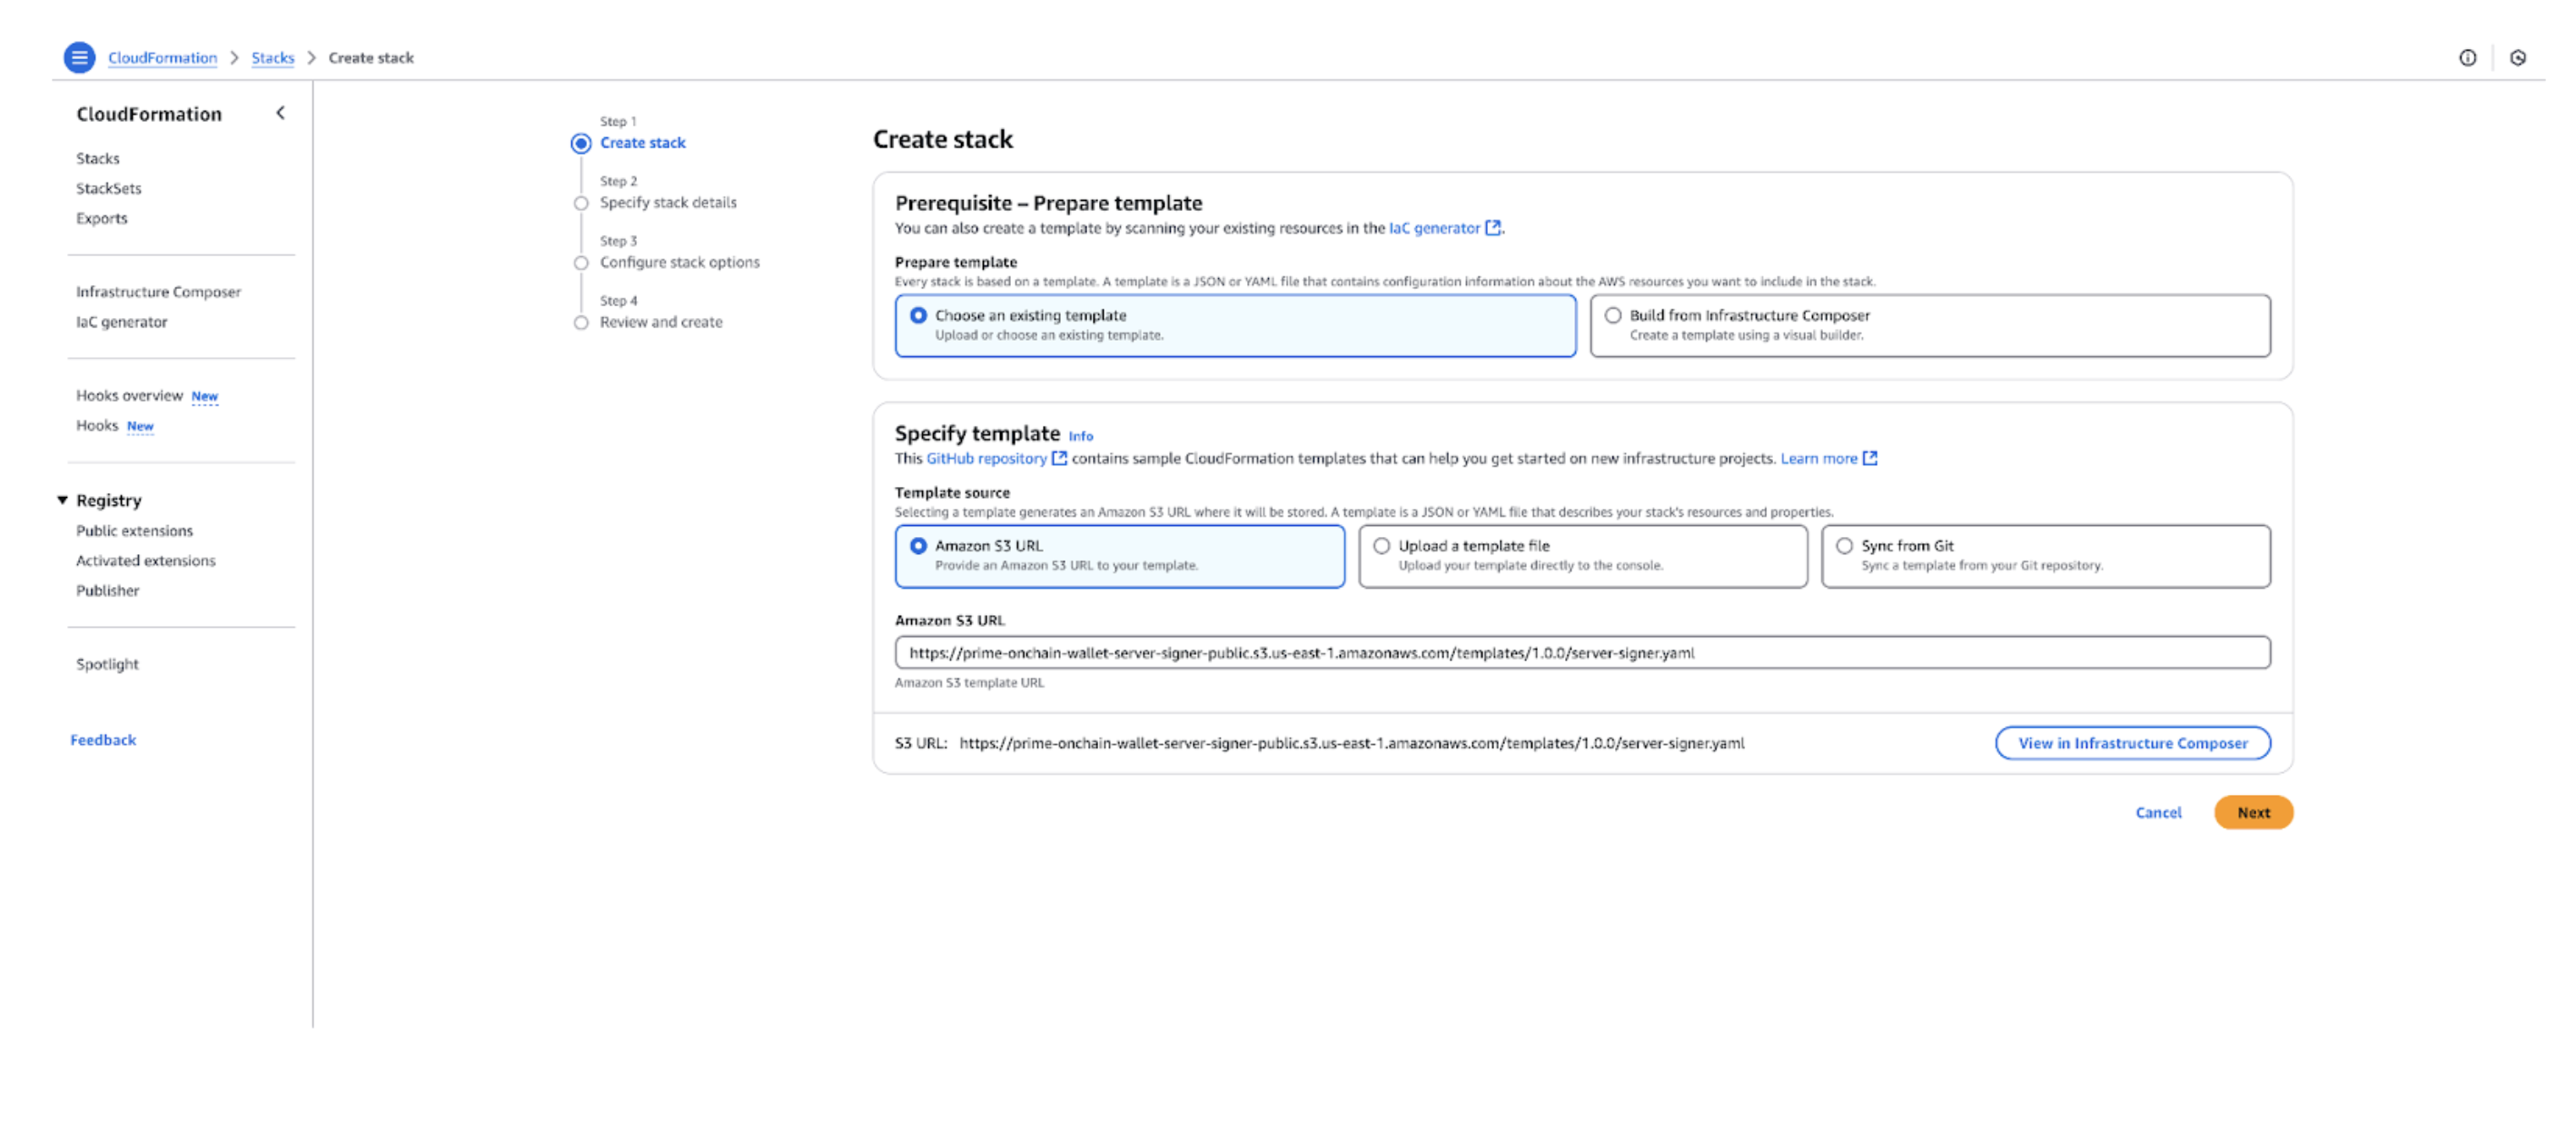
- Go to CloudFormation stack on your AWS Console.
- Click on the Create stack button with new resources option.
- Select “Choose an existing template” option.
- Select “Amazon S3 URL” as your template source.
- Paste the following URL in the Amazon S3 URL field:
- Click Next on this page.
Step 3: Specify Stack Details During Stack Creation
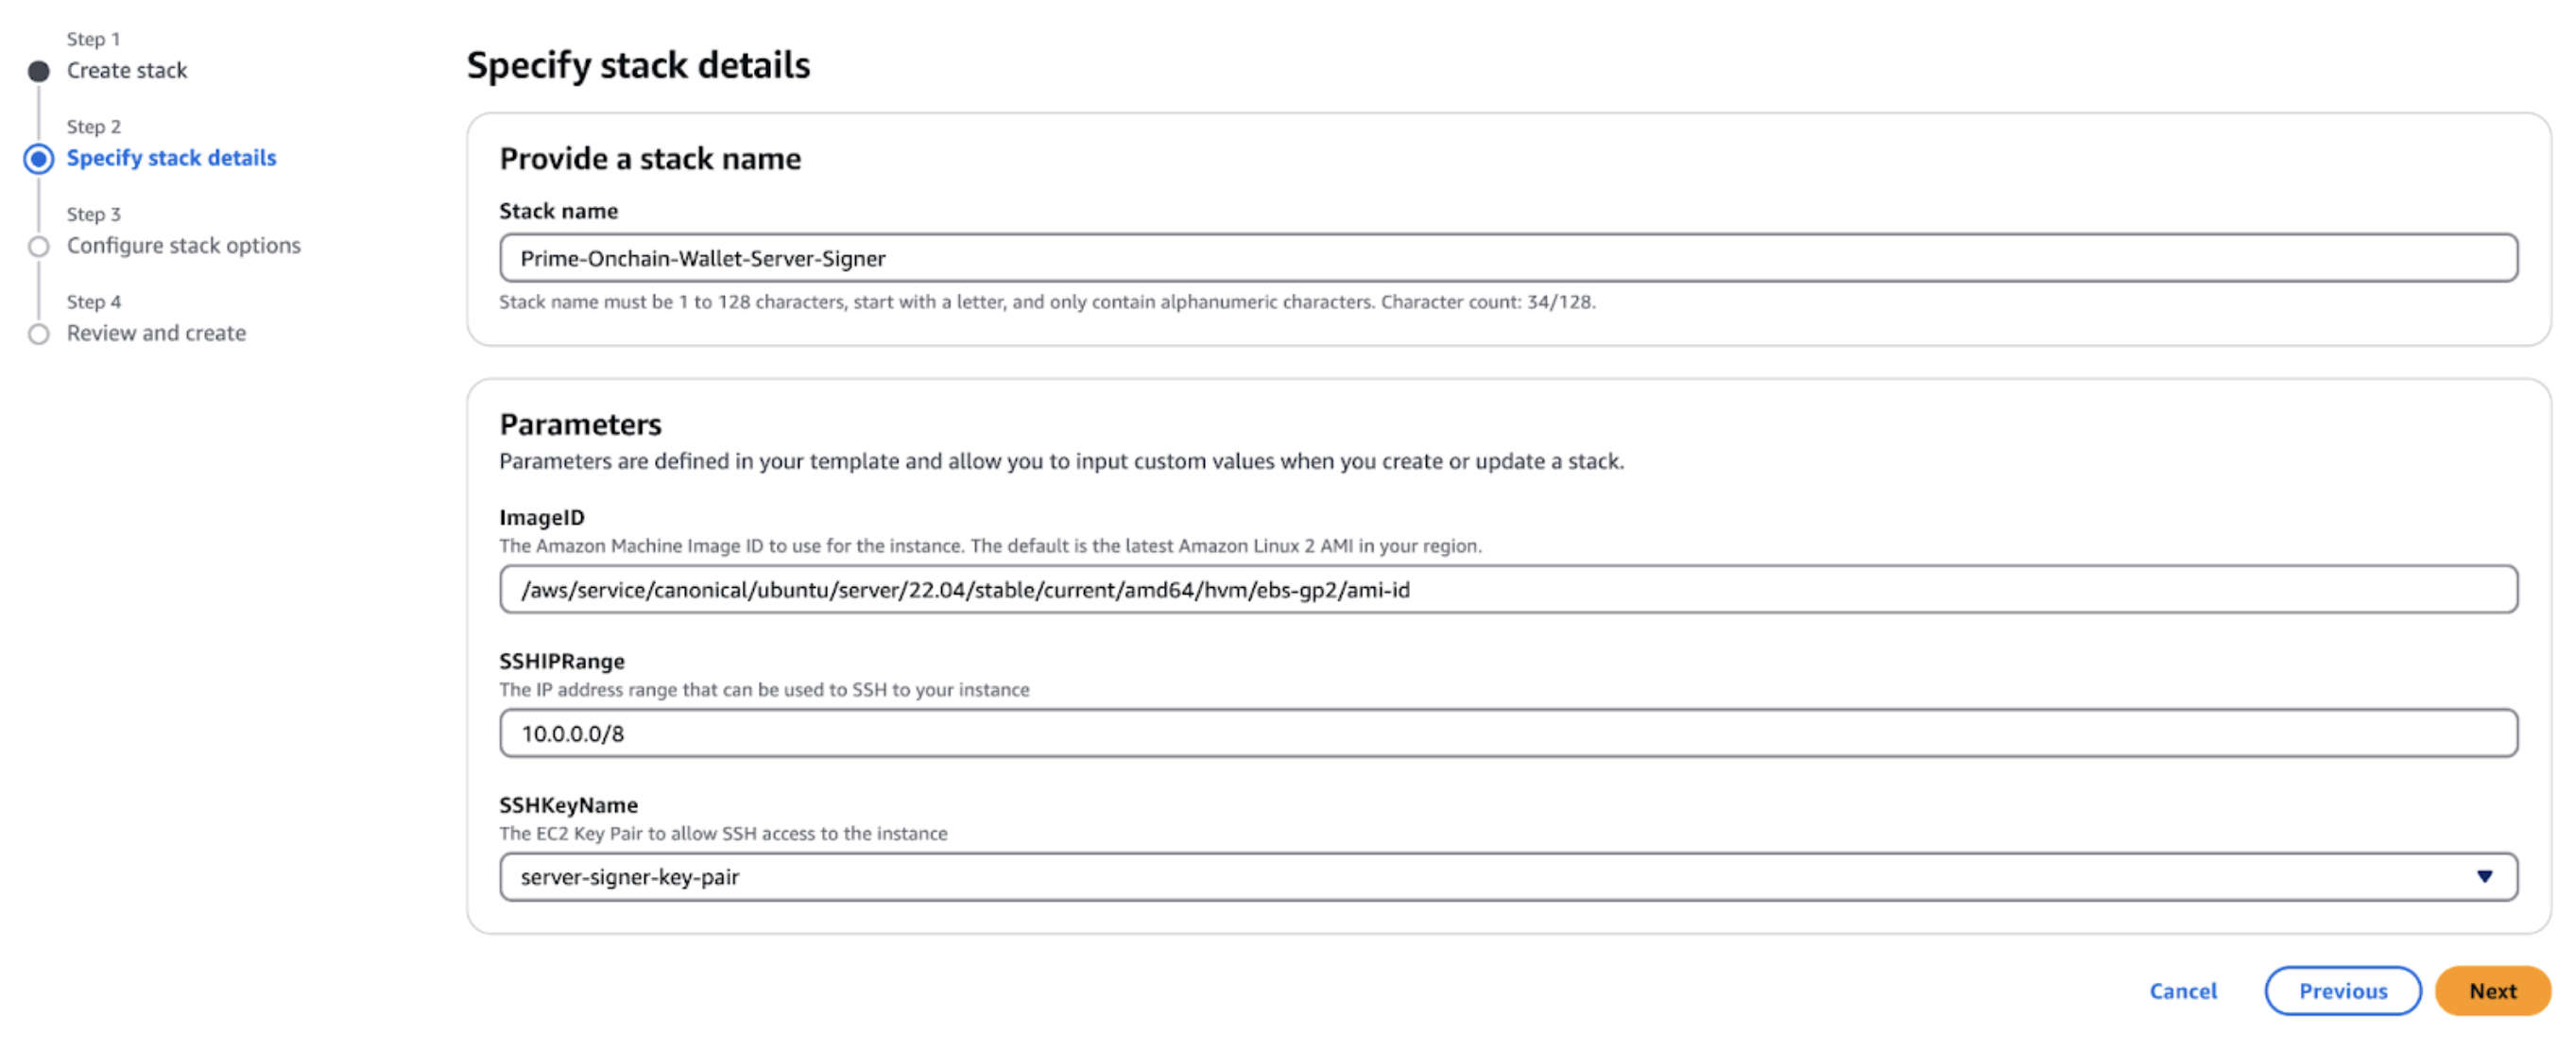
When launching the CloudFormation stack, fill in the required parameters:- Stack Name: Enter a unique name for your stack (e.g., server-signer-prod or server-signer-learning). Keep it short (under 50 characters) as there is a maximum length limit on AWS resources.
- ImageID: Use the default AMI ID (Amazon Linux 2 or Ubuntu as specified) or provide a custom AMI ID if preferred.
- SSHIPRange: Configure the IP range from which you want to allow SSH access (for example, 10.0.0.0/8 or restrict it to your IP).
- SSHKeyName: Select the key pair you created (e.g., my-debug-key).
Step 4: Configure Stack Options
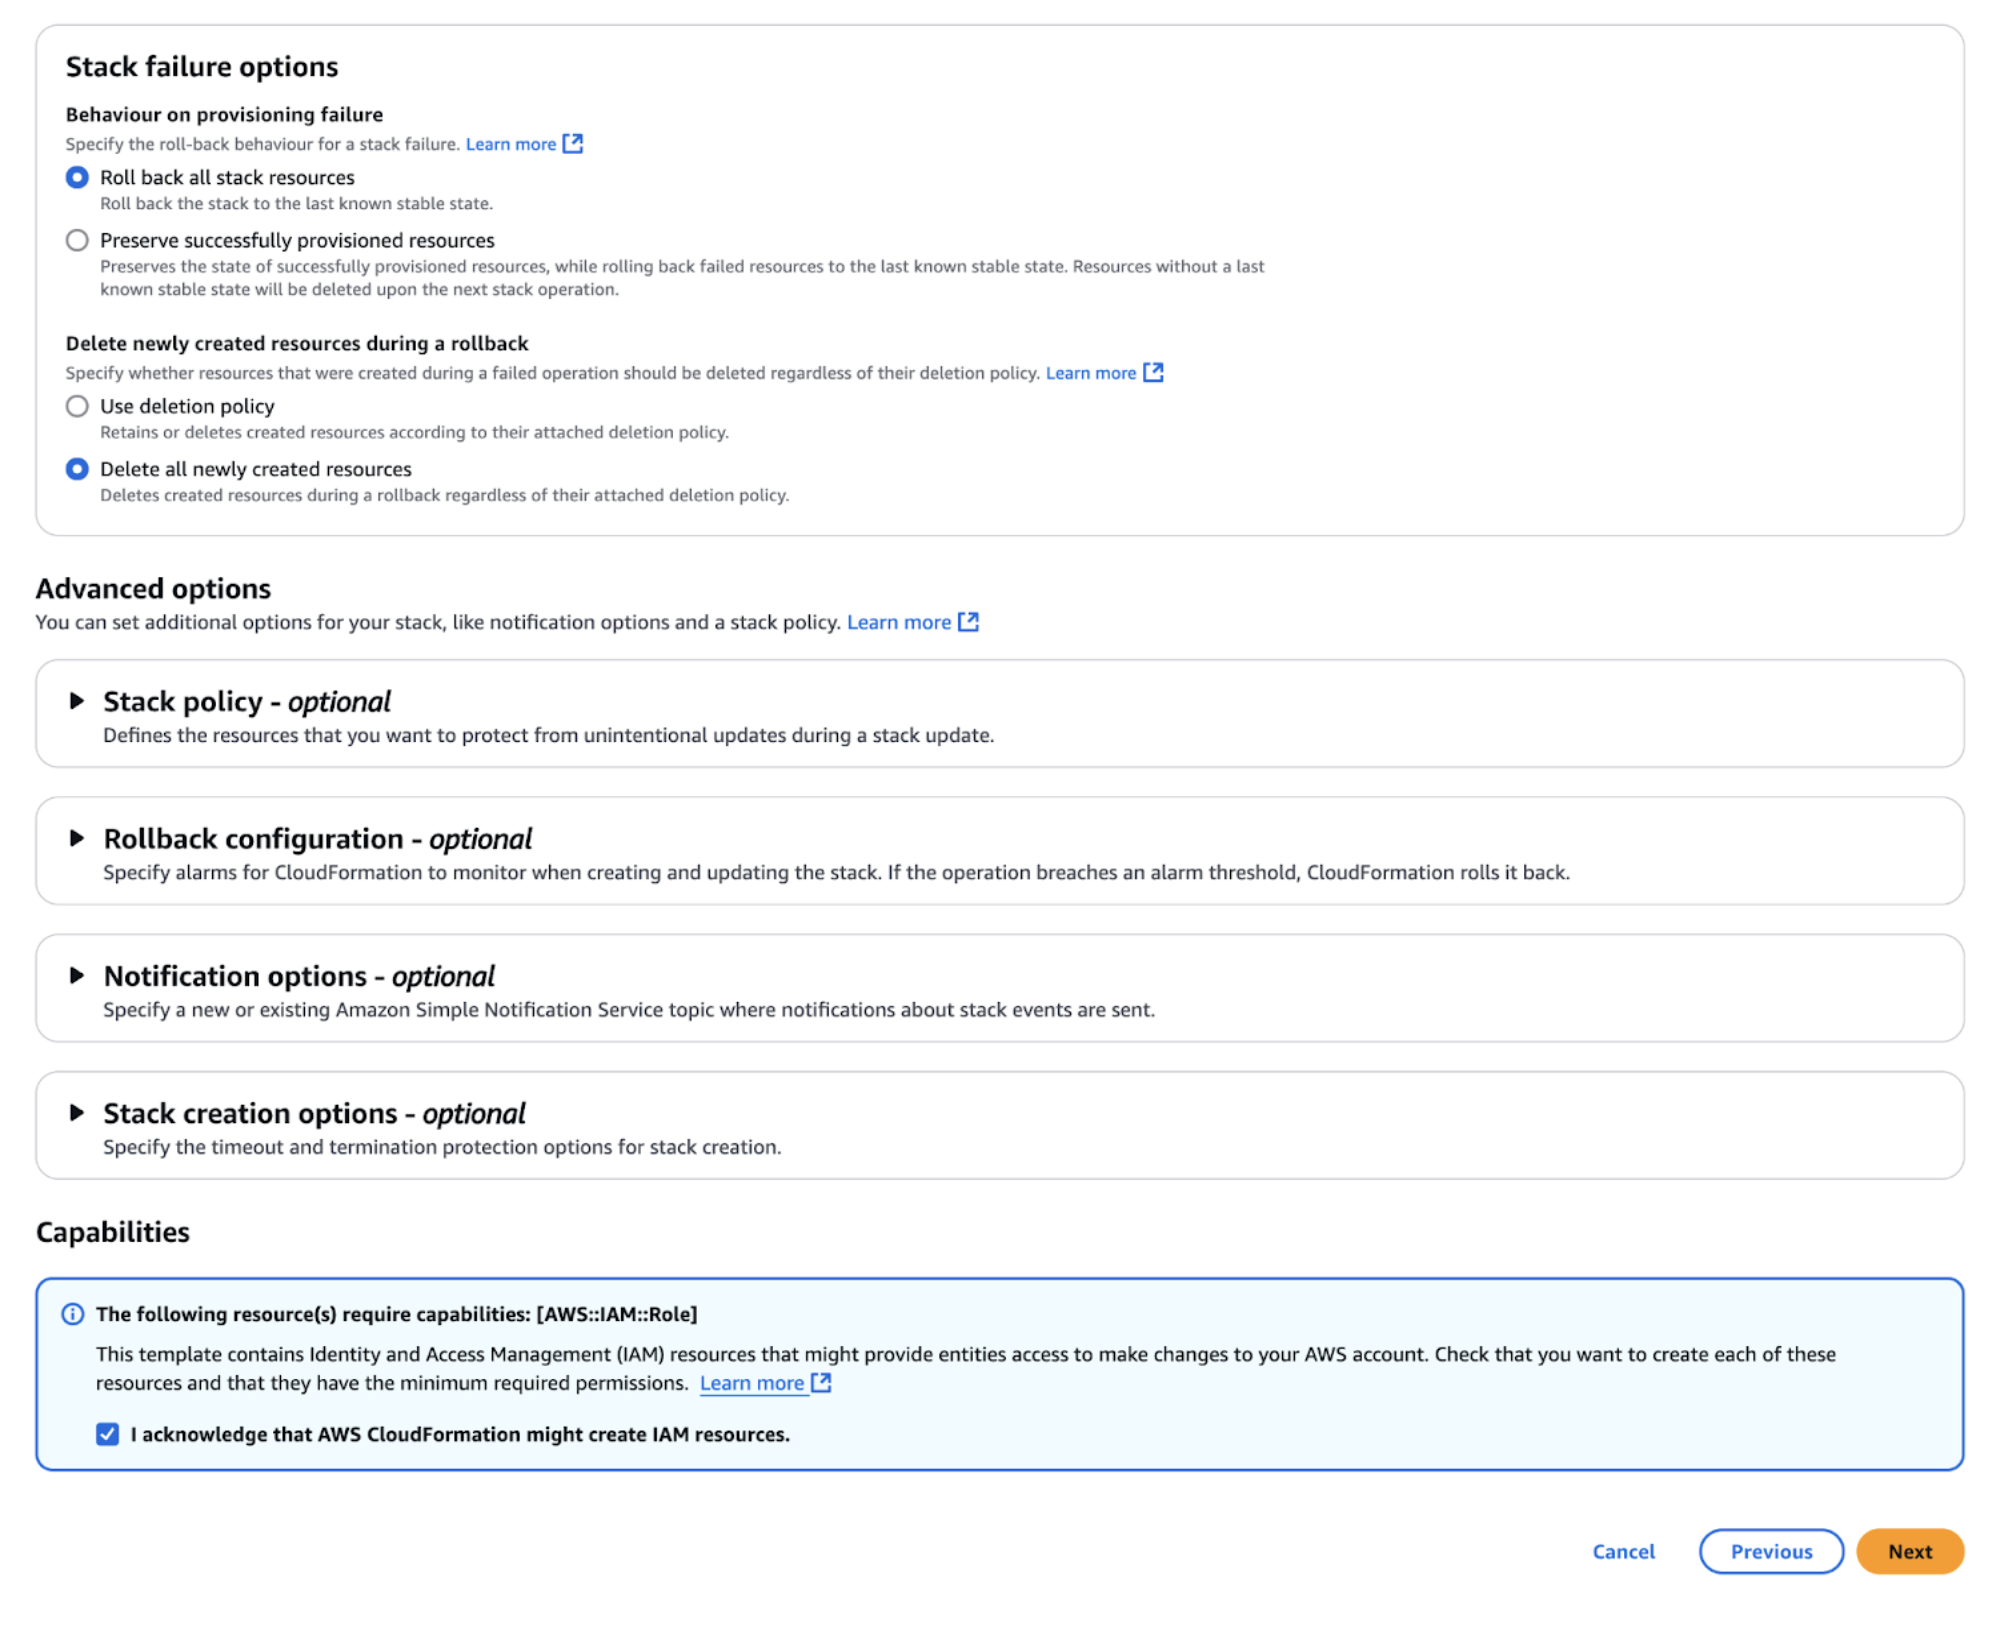
- Stack Failure Options: Under “Stack failure options,” select Delete all newly created resources so that any failure during creation cleans up the resources.
- IAM Resource Acknowledgment: Check the box that acknowledges AWS CloudFormation might create IAM resources.
- Click Next to proceed.
Step 5: Review and Create the Stack
- Verify that all parameters (VpcId, SSHKeyName, SSHIPRange, ImageID, etc.) are correct.
- Click Submit (or Create stack) to launch the stack.
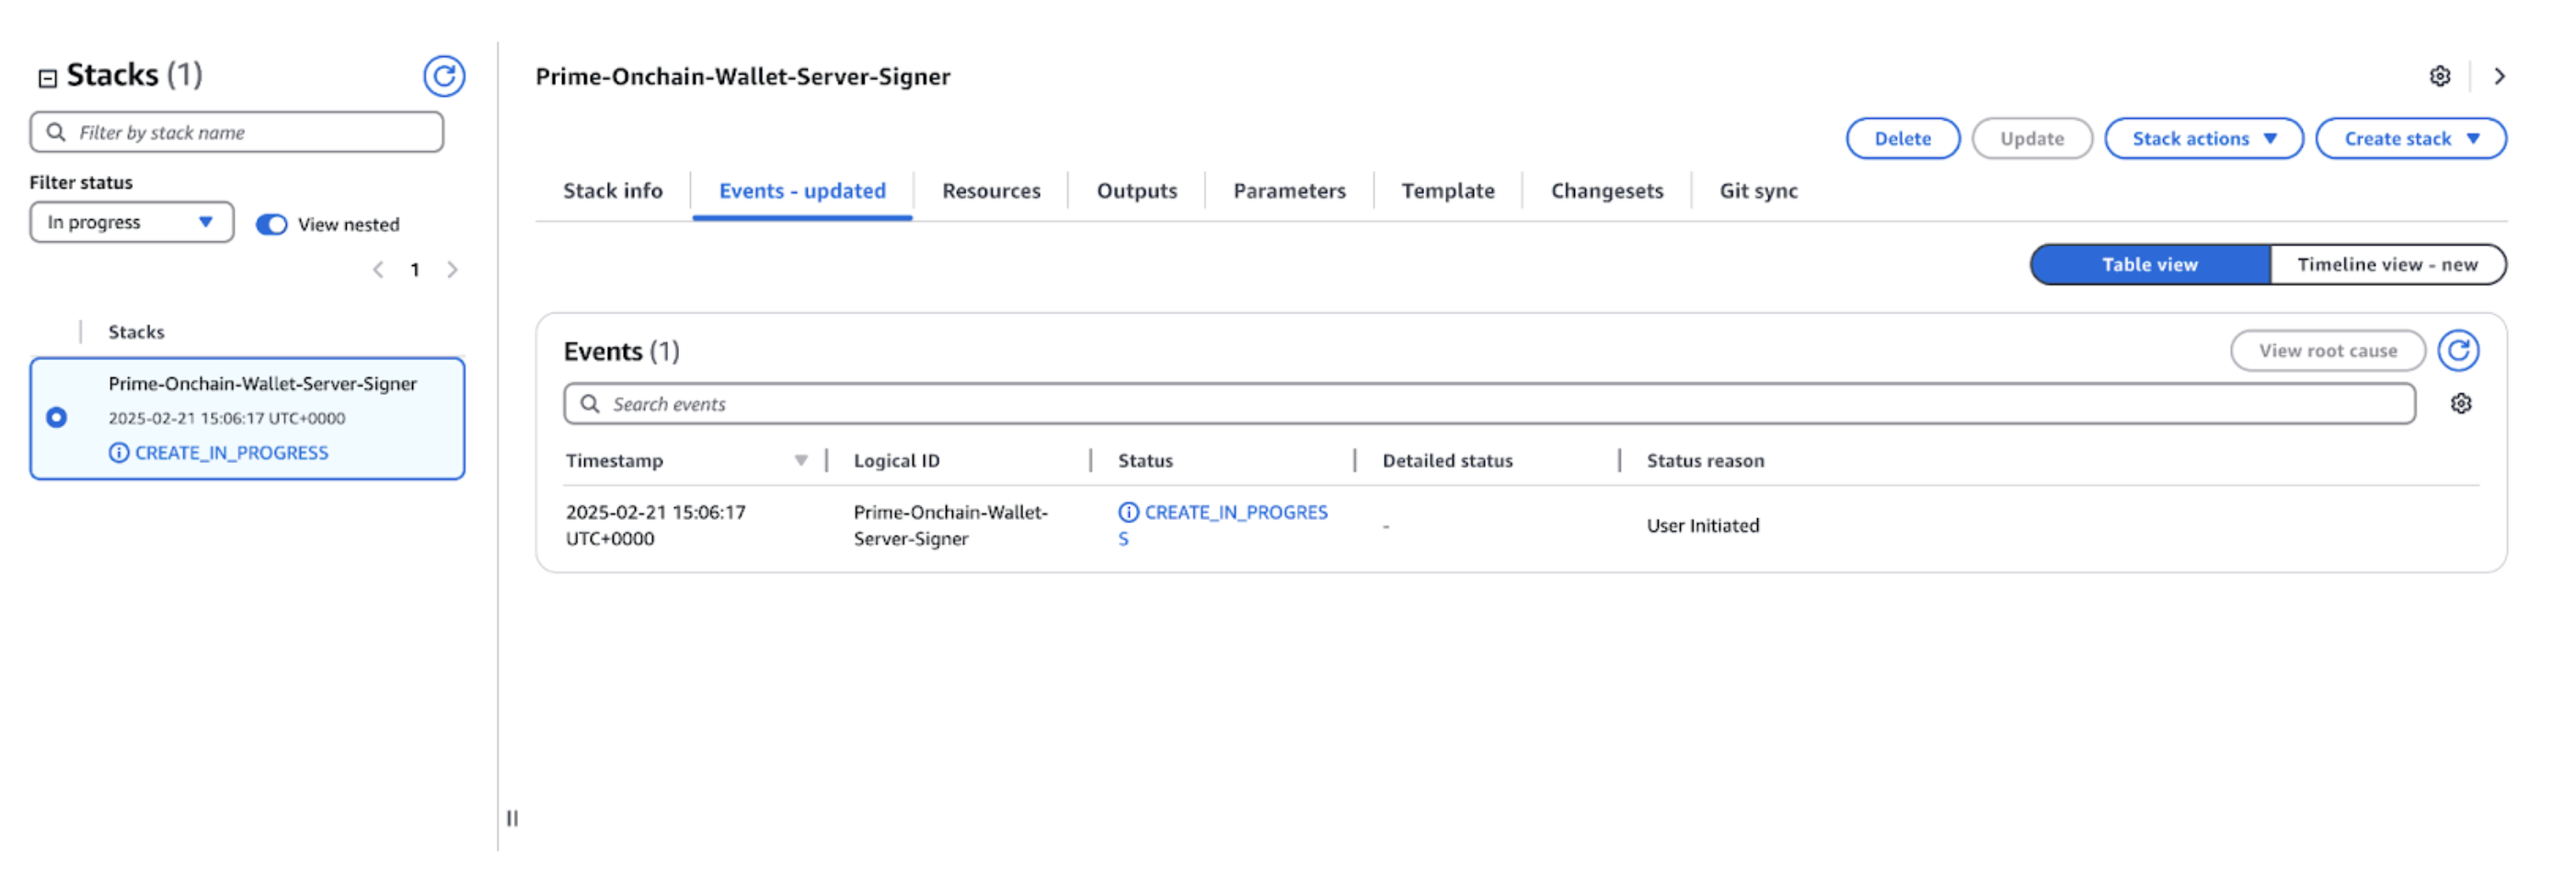
Step 6: Monitor the Stack Creation
- Navigate to the CloudFormation dashboard, select your stack, and review the Events tab to monitor progress.
- Wait for Completion. The stack should transition to CREATE_COMPLETE if everything is set correctly.
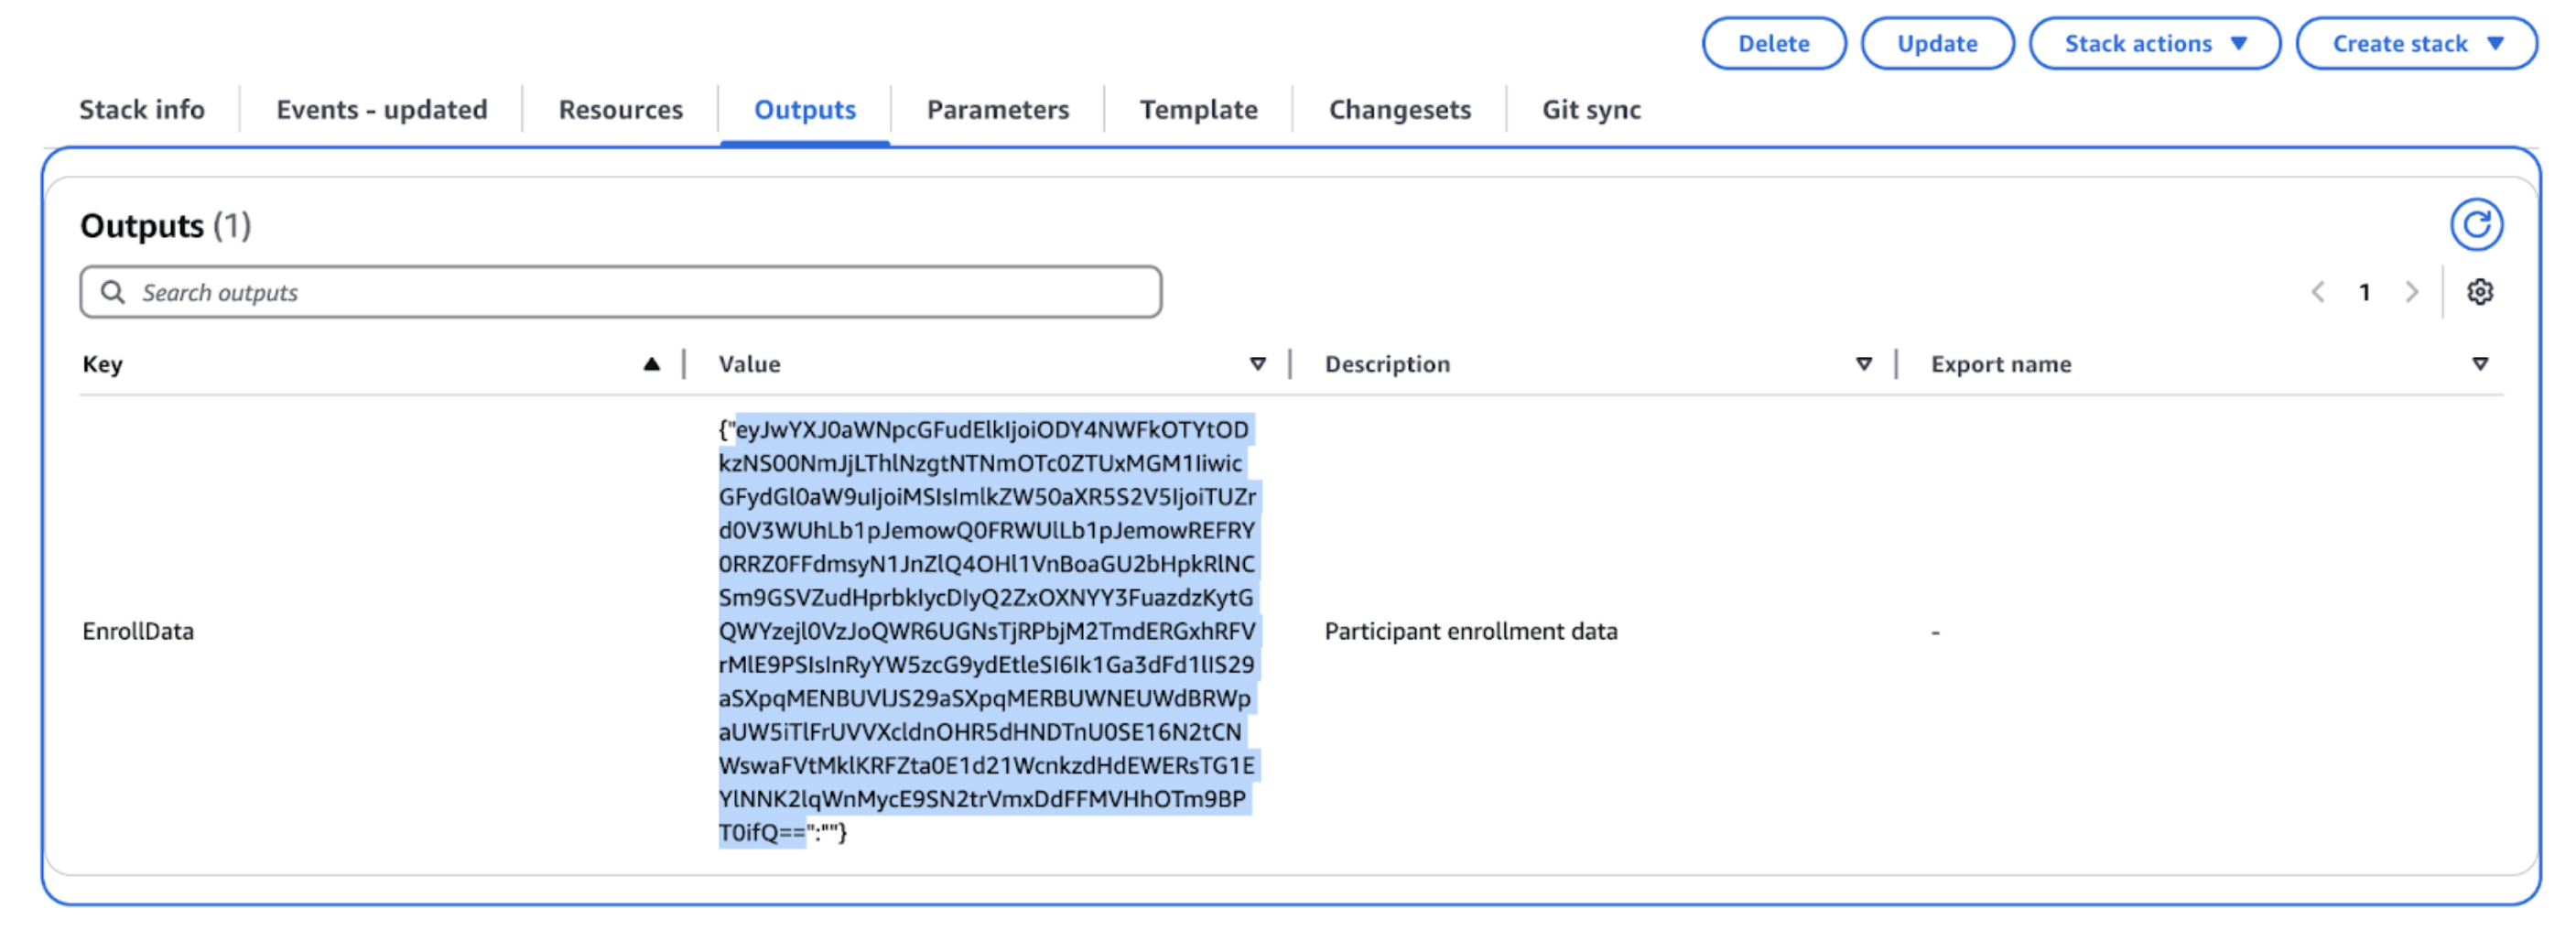
Step 7: Retrieve Enrollment Data
Once the stack is created successfully:- In the CloudFormation console, select your stack and go to the Outputs tab.
- The EnrollData output contains the enrollment information returned by the newly created Server‐Signer instance. Copy the part of the output that contains enrollment data, ignoring any brackets or quotation marks. This will be used during server signer enrollment flow in Prime UI.
 Alternatively, via CLI:
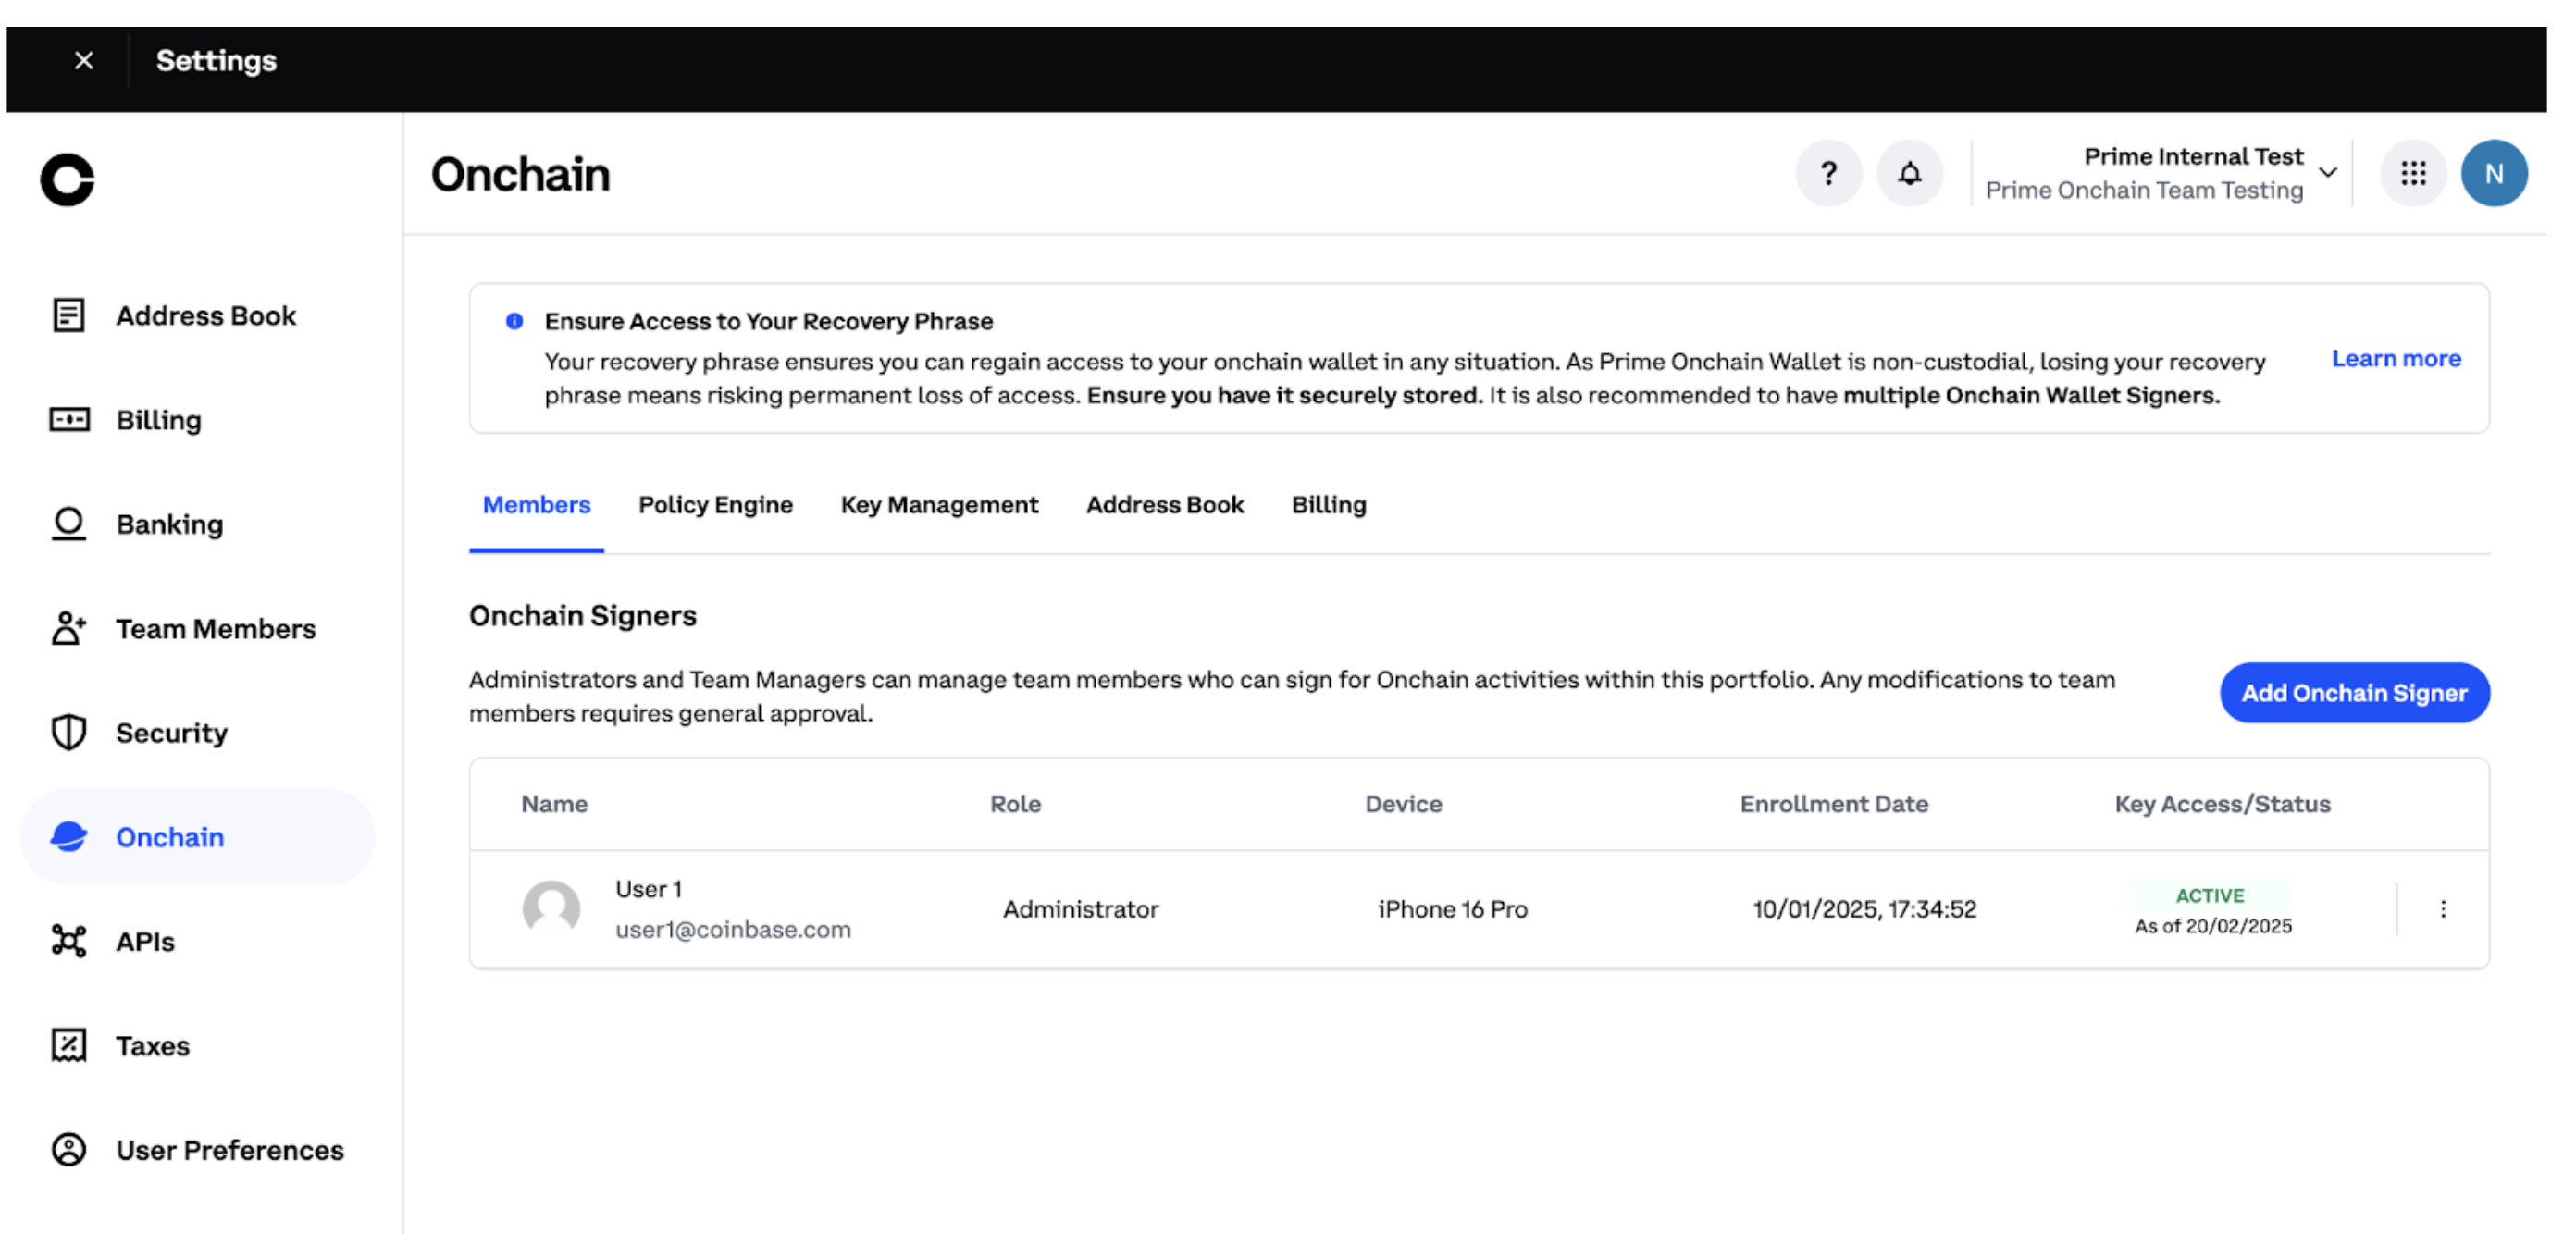
Step 8: Start Server Signer Enrollment flow in Coinbase Prime UI
Once you successfully obtain enrollment data from the stack output, you can start to initiate server signer enrollment.- Go to https://prime.coinbase.com/ and login to your Portfolio
- Navigate to Settings -> Onchain -> Members
- Click on Add Onchain Signer
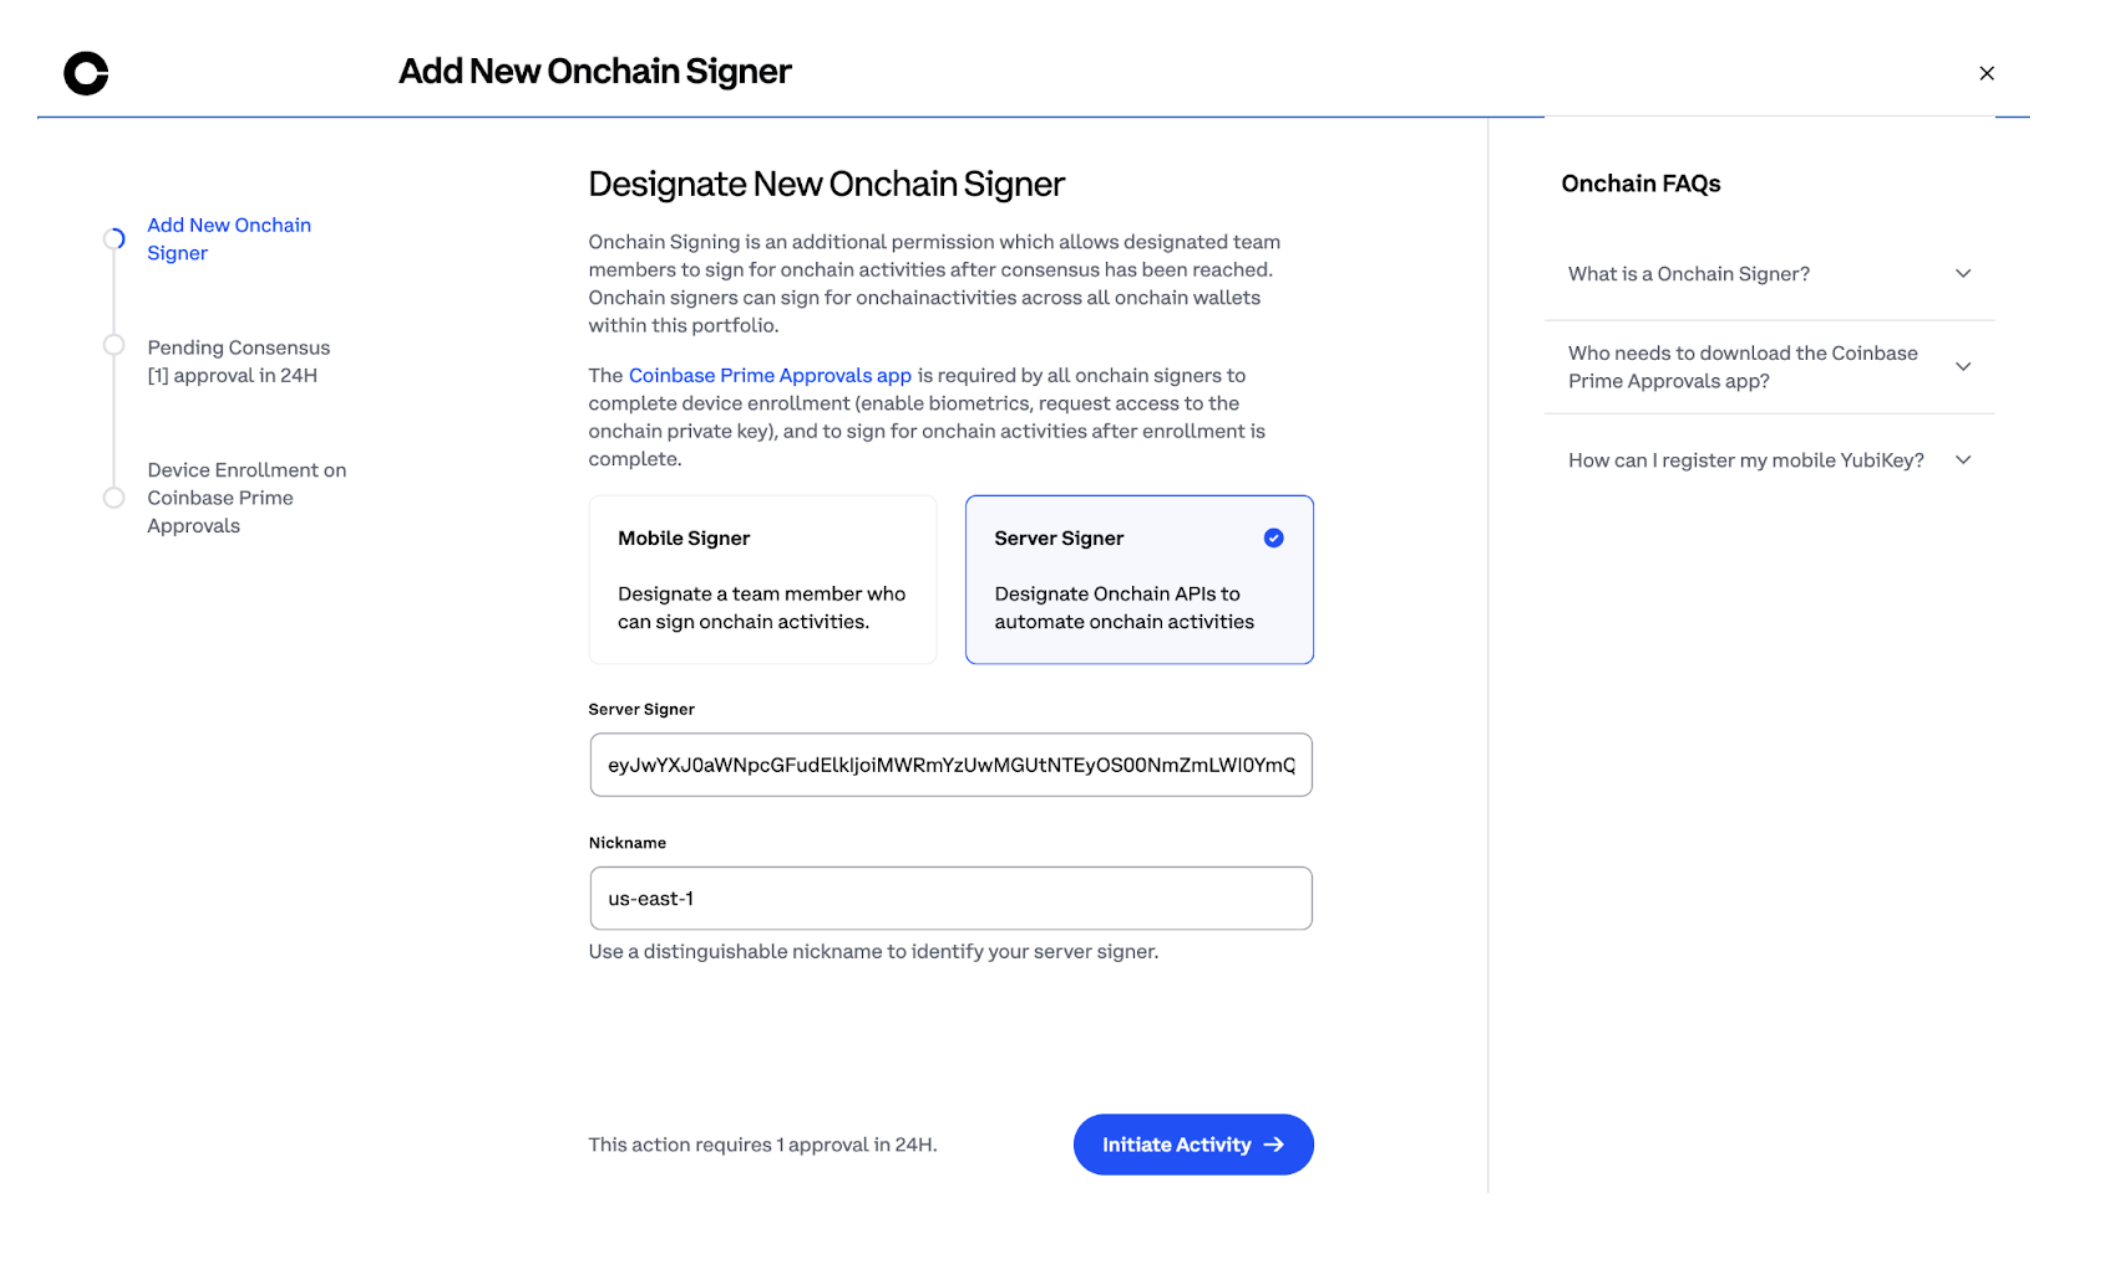
Step 9: Configure Server Signer details
Complete the details:- Server Signer: Input EnrollData copied from AWS CloudFormation stack creation output
- Nickname: provide a unique name that will help you to distinguish the server signer among other signers.
- Click Initiate Activity to proceed. You will need to approve using your Yubikey.
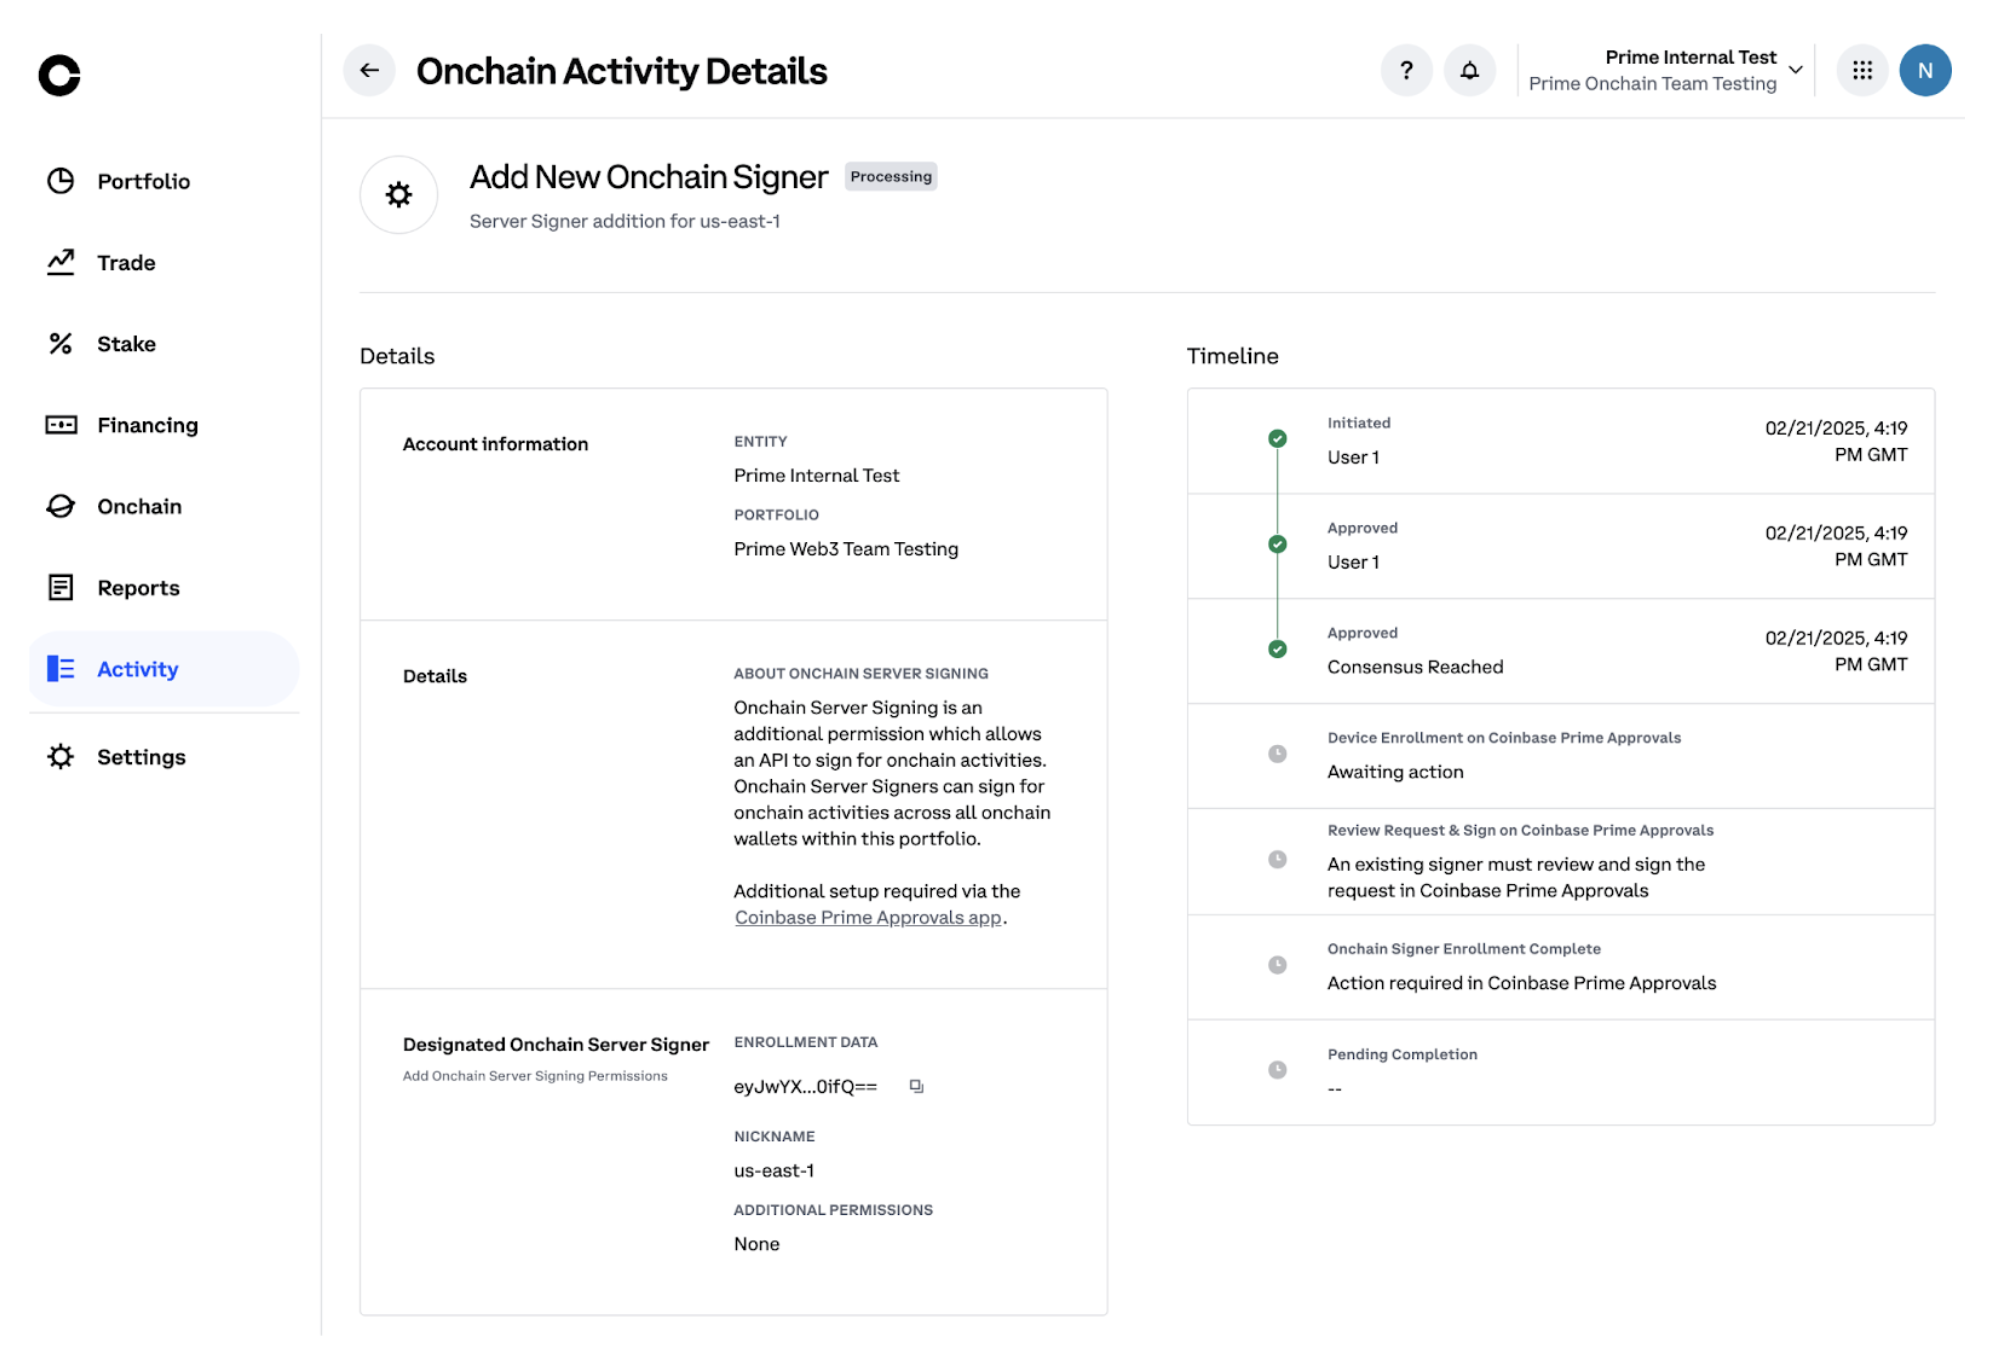
Step 10: Approve Add New Onchain Signer Activity
- Navigate to the activity view
- Reach out to your team members to approve the activity
- Wait for approvals before proceeding further
Step 11: Use the Coinbase Prime Approvals app to provide key shard
- Login to your Coinbase Prime Approvals mobile app
- Navigate to pending activity
- Click on Add New Onchain Signer and proceed with the steps until complete
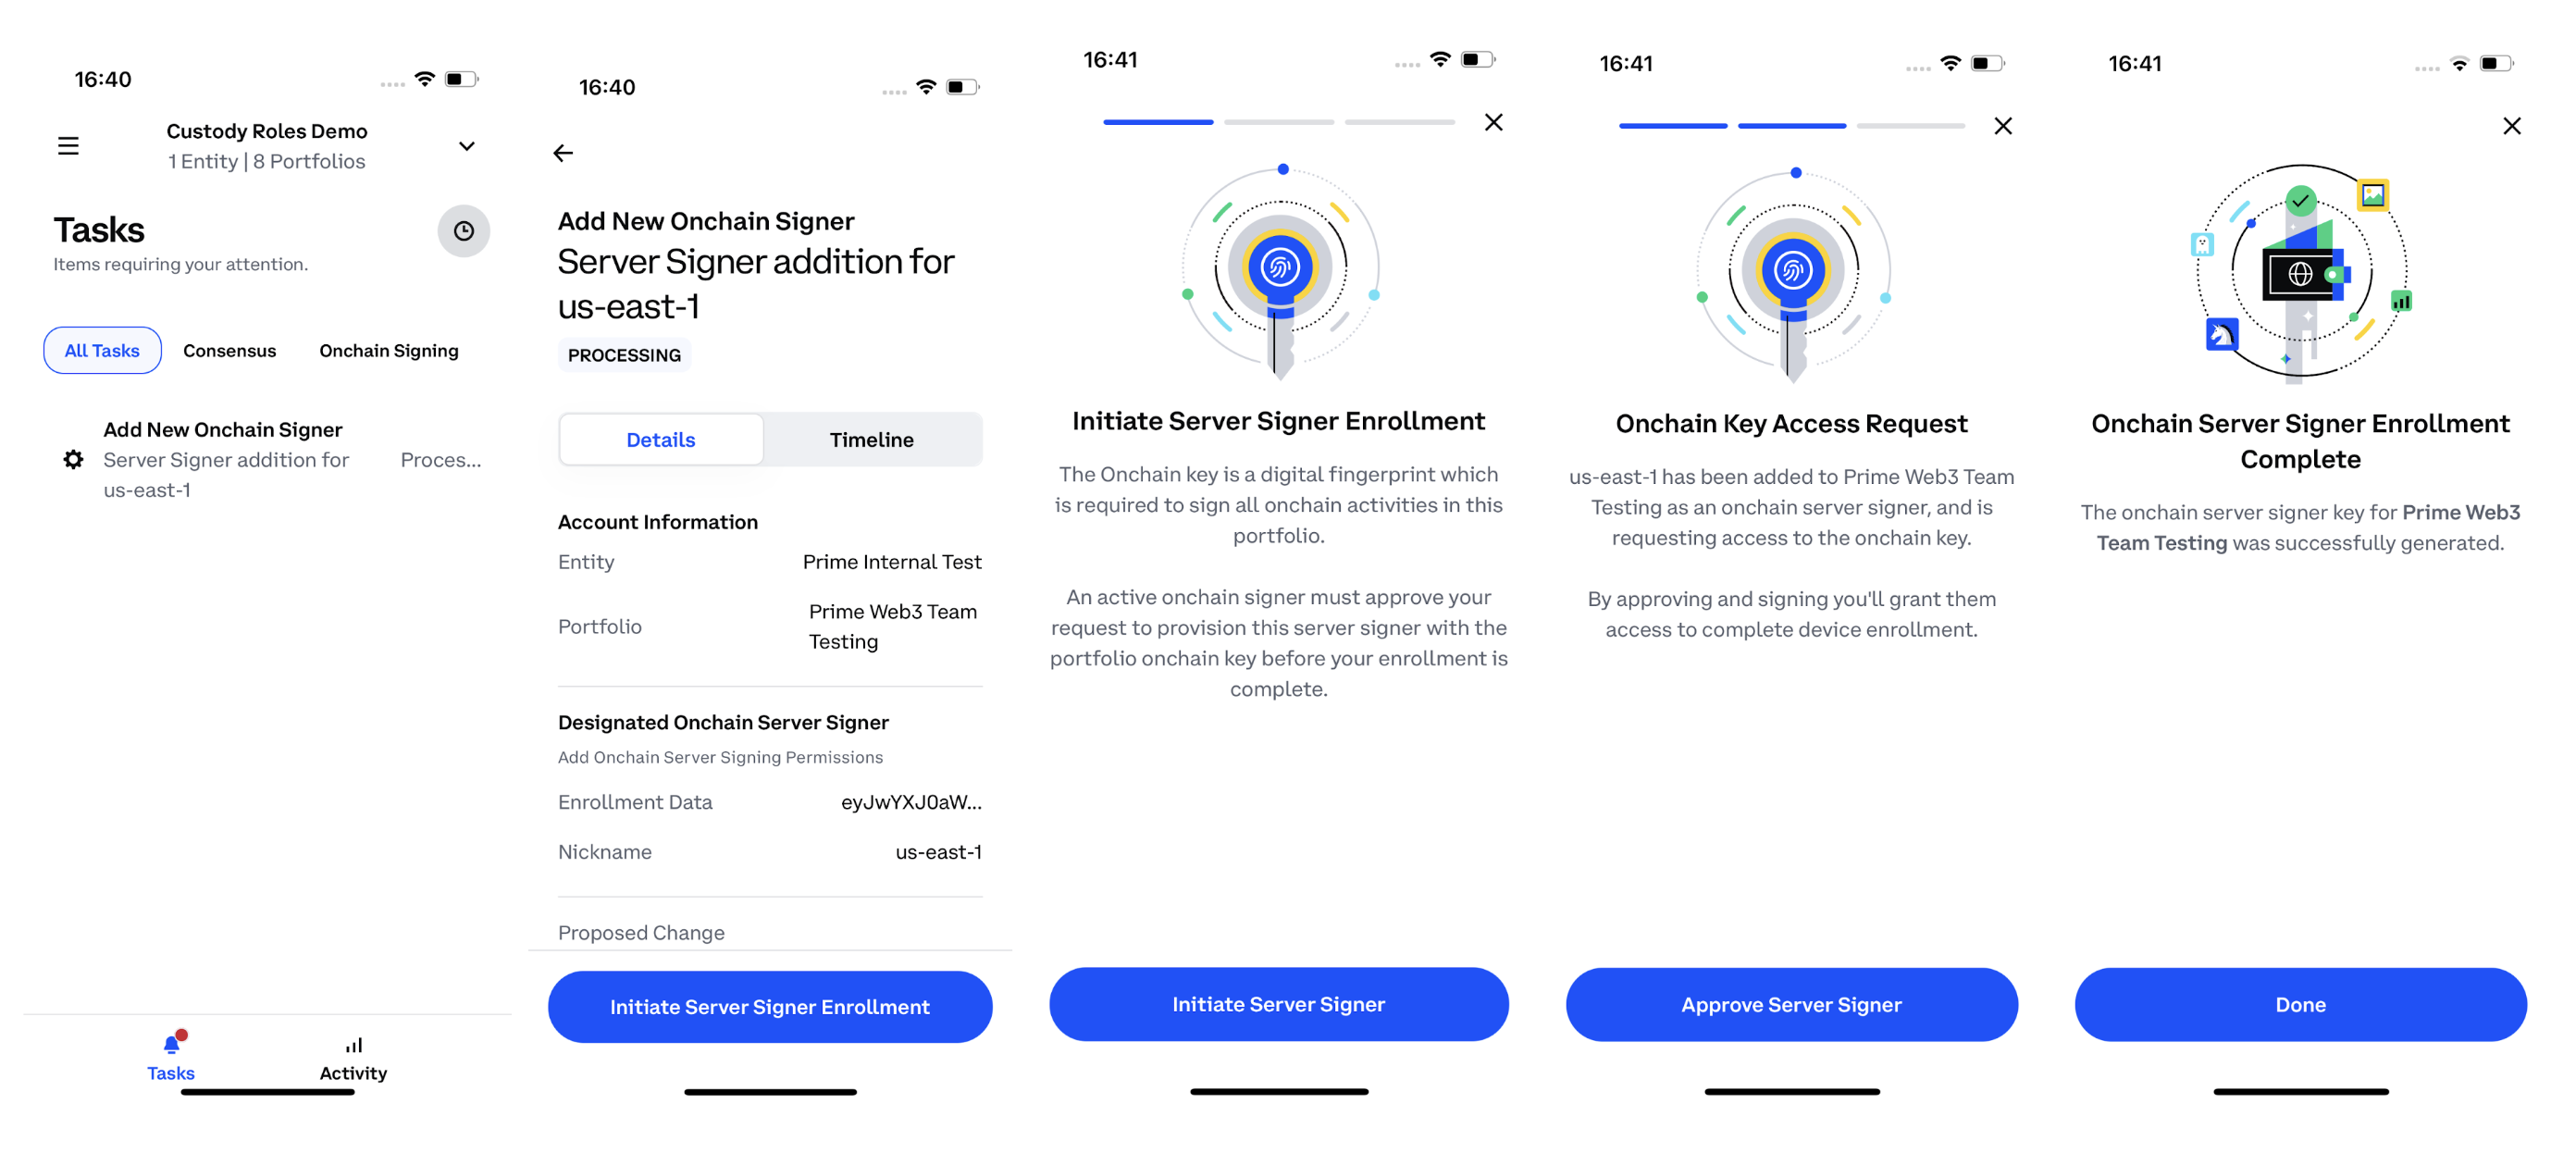
Step 12: Server signer enrollment complete
Server signer enrollment is complete now. You can initiate a transaction and verify that it gets automatically signed after the consensus approval is achieved.Troubleshooting & Instance Debugging
If you encounter issues with your Server-Signer deployment or need to inspect logs for troubleshooting, follow these steps: 1. Verify EC2 Instance Accessibility- Ensure the Instance Has a Public IP:
- In the EC2 console, check that your instance has a public IPv4 address. If it doesn’t, verify that it is in a public subnet or use a bastion host to access it.
- Confirm Security Group Settings:
- Make sure the security group associated with your instance allows inbound SSH traffic (port 22) from your IP address. You can temporarily set the rule to allow SSH from 0.0.0.0/0 for testing (remember to restrict this later).
- Locate the SSH Key and Public IP
- Ensure you have your private key file (e.g., server-signer-key-pair.pem) with proper permissions and note the public IP address of the instance from the EC2 console:
- Connect via SSH
- For an Ubuntu instance, use the following command (replace
[Public-IP]with the actual IP):
- For an Ubuntu instance, use the following command (replace
- Run the command to load the Server-Signer environment variables:
- Use journalctl to follow the logs for the Server-Signer service
- This command will display real-time log output from the cdp-signer service, allowing you to monitor the signing service’s activity and troubleshoot issues.
- Check System Logs: If the Server-Signer logs aren’t providing enough details, review general system logs (e.g., /var/log/syslog or /var/log/messages).
- Review CloudFormation Events: In the CloudFormation console, review the Events tab for your stack to identify any resource creation or configuration errors.
- Confirm Environment Variables: Double-check that all required environment variables (such as database connection details and KMS key identifiers) are set correctly in /etc/cdp-signer.env.